Harnessing the 4 disciplines of Execution
Read more about the 4 Disciplines of Execution here.
Discipline 1: Focus on the Wildly Important. For the 4DX Model (McChesney, 2012) to succeed, the process must be willingly taken on by all key stakeholders in an organization. Therefore, this first essential step, establishing the WIG, or “Wildly Important Goal” cannot be a goal set by just one person. To go through this process as it was intended, my influencer strategy to “spread the message to adults on our campus that coding is fun, accessible and applicable to every content area” will have to be valued and agreed that it’s a shared vision for my school community. To start with a smaller group, my program cohort teacher and I can meet with our fellow CTE teachers (a group of about 8) to begin there. Our department exists to create experiences for students that foster enrichment in Career and Technical Education exploration. So I’d start by meeting with the other CTE teachers to discuss how coding supports our department’s common purpose.
Discipline 2: Act on the Lead Measures. If the lag measures relate to teachers’ self-described experience, knowledge and application of coding in their content areas from beginning of initiative to end, the lead measures will emerge to support that growth. The lead measures, which should also be agreed upon by our group at large, may include the PD work we have envisioned to support teacher growth (see the 6 Key Strategies as defined for influential change (Grenny, 2013) . It will also benefit the group to fully see and accept that the “whirlwind” of everyday school work is going to compete for our time and attention. It will be critical for our team to face the realities of the “whirlwind” so we can be ready for them.
Discipline 3: Keep a Compelling Scoreboard. If we want to measure teachers’ use and opinion of coding in every content area, I think it’d be fair to design a scoreboard that includes every different department on campus to reflect their work and position on the subject. It may look a little like a tall bar graph such as those seen on telethons when money is being raised and each donation moves the needle up a little. In this case, our needle would increase to the next incremental point when most teachers in any department conclude, through the post-PD survey, that coding is fun, accessible and applicable to their content.
Discipline 4: Create a Cadence of Accountability. The CTE department doesn’t have a weekly designated meeting time, but stays in constant communication via email, meets with faculty at large, as well as meets throughout the school year as needed/required. I think the approach to meetings as described in the 4DX model (McChesney, 2012) would appeal to my co-teachers because of its simplicity and transparency. In order to carry this initiative forward, the stakeholders would agree on a time that everyone is available and commit to regular check-ins. As AISD begins the school year remotely (Austin Independent School District, 2020) we may have to adjust this plan and/or meet through Zoom, etc.
Where are We & Where are we going?
To understand our point in the process, we need to first understand the various stages.
Stage 1: Getting Clear. Key stakeholders agree on the wildly important goal and process to achieve the lag and lead measures to support the goal. My team is at Stage 1 currently.
Stage 2: Launch. Or put another way, bring everyone together to do the dang thing. Another important step in this stage is to Identify the models, the potentials and the resisters. My group will need to all agree on the process and fully embrace the efforts if we’re going to be successful. I think it may also be interesting to have teachers self-evaluate their comfort levels and identify themselves as a model, a potential or a resister. Teams are highly impactful when they “move the middle” (McChesney, 2012), so this kind of self-reflection may also help some teachers immediately take on the role of a potential.
Stage 3: Adoption. Find the rhythm of the new habits and begin to see the work pay off. Measure and discuss. We will have to have regular check-ins to see how things are going and how everyone is doing. Transparency and accountability will be essential.
Stage 4: Optimization. Stakeholders propose changes to maximize and support goal. Team takes ownership of the process. At the mid-way point in the term, such as the end of the fall semester, it will be a good time to reflect on the WIP, the lag and lead measures to solicit input from the group to see what we may need to adjust, whether that’s our approach, attitude, etc.
Stage 5: Habits. Create a culture of excellence execution. It may not be realistic to reach this stage by the end of the school year, but we’ll be in better shape if we take stock once again at the end of spring semester to see how teachers are doing with the overall initiative.

Photo by NESA by Makers on Unsplash
References
McChesney, C. (2012) The 4 Disciplines of Execution: Achieving Your Wildly Important Goals. Free Press.
Austin Independent School District. (2020) Austin ISD Covid-19 Updates. Retrieved from https://www.austinisd.org/covid19
Grenny, J. (2013) Influencer: The New Science of Leading Change. Second Ed. McGraw Hill.
Influencer Strategy
|
Source 1: Personal Motivation
|
Source 2: Personal Ability
|
|
Source 3: Social Motivation
|
Source 4: Social Ability
|
|
Source 5: Structural Motivation
|
Source 6: Structural Ability
|
How does this connect to our Innovation Plan?
At Burnet, we have a multi-prong plan that includes coding camps open to students in the entire district, a weekly after-school girls coding camp led by a female high school student, and integration of coding through our robotics classes using Sphero robots and coding concepts woven through creative work in the Apple programs such as Everyone Can Code, Everyone Can Create, etc.
At the root of all our work is fun. Coding is already fun, so how do we help students experience that? How do we emphasize that coding isn’t just for some people, but that literally, as Apple so succinctly proclaims, Everyone Can Code? Furthermore, Everyone Can Create.
Influencer Strategy: Spread message to adults on campus that coding is fun, accessible and applicable to every content area.
Desired Results: To that end, in our second year, I would like to not only continue our first year programs, but disseminate and demonstrate the message to teachers and administrators on campus as well. We need to share the same message about coding to the adults on our campus that we’ve had students absorb and experience. If a program is vital and thriving, it should go beyond the people who lead it. In other words, if I and my program-cohort weren’t on our campus, would others carry the torch and continue these initiatives? Not if they don’t see them as valuable. Furthermore, I think we need to emphasize to teachers that not only is coding fun and accessible, but that computational thinking and coding concepts translate to their own various content areas. The common resistance to new information at PDs is that “this doesn’t apply to me.” So that will be an area we need to intentionally focus on for any future trainings.
Measuring Results: We will survey the teachers to find out what their experience is with coding to get baseline data. We will host a PD (whether in person or virtual) to introduce teachers to coding and take them through some of the same experiences we craft for students. Ideally, it would be powerful to have students as teachers in the clinical portions of the PD to have added support and automatically draw on the student-teacher relationships that already exist. At the end, we should survey the teachers again. We’ll be successful if they mostly report that coding is fun, accessible and applicable to their content.

Photo by Javier Allegue Barros on Unsplash
|
6 Key Strategies as defined for influential change (Grenny, 2013)
1. Note the obvious. 2. Look for crucial moments. 3. Learn from positive deviants. 4. Spot culture-busters. 5. What are the vital behaviors to change? 6. Who are your organizational influencers? References Grenny, J. (2013) Influencer: The New Science of Leading Change. Second Ed. McGraw Hill. |
Notice the obvious: Aside from students, and far beyond money or other tangible supplies, we believe as teachers that time may be the most valuable resource we have. No one has enough time, and we all want to maximize it. Teachers want to spend time focused on planning for their lessons to get the greatest return on that investment of time. How do we make the connection for teachers that coding can enhance their own lessons in any content area, and ensure that a PD focused on coding will be a good investment of time?
Look for crucial moments: To successfully roll out any kind of PD, we should examine the characteristics of previous PDs that teachers qualify as the most valuable. What did those trainings have in common? What made them specifically high-leverage for our faculty? We should also try to pinpoint the traits of PDs that are less successful (in teachers’ opinions) so we can avoid those pitfalls that have gone before us.
Learn from positive deviants: Find the other leader teachers on campus who are open to new learning in technology, who may already be using coding in some capacity. Those will be the stakeholders who can help share positive coding experiences with the rest of the faculty and translate value into various content areas. Ideally, it would benefit us to recruit one positive deviant in each content area to be a teacher leader and resource point person for the rest of their department.
Spot culture busters: On our campus in general and in the elective department specifically, a common line of thought is, I’m the only one who teaches this content or material, so there’s very little cross-over from my course to another. Even worse, a teacher may have the attitude that a teacher in a different department may have little of value to share. To bust through that culture, we should routinely be looking for connections and cross-over from one subject to another. It’s easier to do this with techniques and classroom strategy than material, so we’ll look for those in potential PDs.
What are the vital behaviors to change? The other culture that is rampant on many campuses, including ours, is that we bring in outside experts to lead us in new learning, rather than looking to our ranks to lead PDs. Teachers are tired and not everyone may jump at the opportunity to lead a PD, but the door is typically open in our district and on our campus, so it will take more of us to step up and out of comfort zones to lead those PDs and break through that culture. An added value is that the response to people outside of our campus is frequently, “well, sure, but they don’t know us or what we are dealing with here at Burnet.” That notion is eradicated when the person leading the PD is a teacher right down the hall who has firsthand knowledge of your campus, concerns and goals.
Who are your organizational influencers? We’ll start with myself, and my program cohort teacher, because we’re the ones leading the initiatives. As stated above, it would be valuable to add other teacher leaders (one from each department if possible) who are already leading blended learning in their own classrooms and/or have some positive experiences with coding. Additionally, we can recruit student leaders in our classrooms who would enjoy teaching their own teachers in a PD setting. It will be important to bring in administrators to the efforts, but they shouldn’t necessarily be the ones leading any sort of PD or training because we want to emphasize that coding concepts are accessible to everyone, and this will be a bottom-up approach.

Photo by Ross Findon on Unsplash
Personal Logo design: who are you?
Graphic Design
Learning Objective/TEKS: 10E – Analyze and apply art elements and principles.
Language Objective: Design a personal logo that reflects your personality or interests.
Essential Question: How can we represent ourselves in our work?
Coding Connection: Just like a line of code, a logo communicates. It sends a message about the company or organization, its purpose and its identity. Symbols can also send a message, like a heart or lightning bolt.
Equipment Needed: Computer or tablet with access to the internet.
Lesson:
Introduce definition of a logo. Discuss how logos are some of the hardest things to design because they're so simple, with just a color or two and some kind of shape or simple illustration. If you have students journal as a warm-up, they might have completed a page where they identify well-known logos.
If there were a logo that symbolized you, what would it look like?
|
Step 1: Brainstorming. Students generate three ideas for each of the following categories: animals, activities/sports, symbols, locations, things I like. Of all their 15 ideas, circle the three best ideas for a possible logo design.
Step 2: Explore colors. Review the color wheel with students, and discuss how logos often use 2 complementary colors, which are opposite each other on the color wheel.

Students explore color themes at color.adobe.com. They jot down their favorite color combinations, which they may use as a reference in their logo design.
| |||||
Step 3: Create design. Students visit www.logomakr.com to create their logo. There's a short video tutorial that show them how to use the tools, which I recommend they watch.
Students edit their design and then save it when it's complete. For a grade, students upload their work to the shared folder we have in class or submit their work in Canvas/Blend. If you've already had students create online portfolios, where they keep and showcase their work, they should also upload their logo to their portfolio.
Students edit their design and then save it when it's complete. For a grade, students upload their work to the shared folder we have in class or submit their work in Canvas/Blend. If you've already had students create online portfolios, where they keep and showcase their work, they should also upload their logo to their portfolio.
| personal_logo_day_3_-_logomakr_draft_design.docx |
|
Here's an example of a personal logo that I created using logomakr.com. Be sure to have your students save their work to their portfolios. Here's an example of what that might look like in Google slides. |

|
Photo scavenger hunt: letters hiding in plain sight
Photography
Learning Objective/TEKS: 1B – Create original works as a means of expression.
Language Objective: Observe and capture objects in surroundings that form letters of alphabet.
Essential Question: How can we see our environment in a new way?
Coding Connection: The alphabet is the first type of code we learn to read. Letters combine to make words that communicate information. The physical forms of letters are highly recognizable in our world, but if we examine our surrounding environment, can we unlock the shapes of those letters in found objects?
Equipment Needed: This photography project can be completed using any kind of camera: a digital or film camera, or a device like a phone, tablet or laptop camera will work.

|
Lesson: Everywhere we look, we see objects-- man-made or natural. If you stop to think about it, the objects we see create different shapes. What if we tried to see objects that form the letters of the alphabet? For example, look at a clock. What letter could it be? |
|
Now look at this pencil. What letter can you see? |

|
These photos were taken by students for this project. Click through and see if you can identify the letters they captured.
While it's not necessary, I give students a list of the alphabet so they can keep track of the letters they find "in the wild." Inevitably, there will be letters they find lots of examples of (O, I, T, etc.) and plenty of others they may not find at all. Challenge them to keep looking, and they may be surprised at what they find. When you give the directions, I also explain that for this assignment, it's not acceptable to take a photo of a keyboard or letters on a bulletin board. Their job is to find an object that isn't a letter, but it's forming the shape of a letter.
When this project is over, it's also interesting to ask students what the purpose was. They often say pretty insightful things about noticing their surroundings, looking beyond the surface, and seeing things in a different way. They also come back and say that once they start to see letters in their environment, they can't stop seeing them! This is such an important lesson for students to understand the value of changing your mindset as a photographer. You have the same things around you as every other photographer, but what do you *see* that's different?
As Ernst Haas said...
I am not interested in shooting new things-- I am interested to see things new.
Everyone Can Create: Objects Personified
Graphic Design + Photography
Learning Objectives/TEKS: 10E – Analyze and apply art elements and principles.
Language Objective: Create a photo with sketched illustration of an everyday object.
Essential Questions: How can we bring inanimate objects to life through illustration?
Coding Connection: Coders bring programs and apps to life. How can we bring an everyday object to life, by adding elements to it so that others can see a living creature?
Equipment Needed: This photography project can be completed using an iPhone, iPad or Chromebook. Other devices with cameras will work if they have built-in programs that allow you to add illustrations to a photo. Apple devices have Markup, and on a Chromebook, you can use Chrome Canvas. If you have students on iPads, please visit the App store and download the ebook Everyone Can Create: Photo (on iPad). It's not necessary for this project, but will give students some step-by-step directions and good schema-building activities prior to the project. If they're taking photos on an iPad, this lesson will also walk them through the photo editing tools and completed examples using Markup.
Lesson:
ELA Connection: Start by asking if anyone has heard the word "personification" and if so, ask if anyone knows what it means. Ask what class they've heard that word. Define personification as giving human traits to inanimate objects or things. If possible, give a couple of examples, i.e. The moon played hide and seek in the clouds, or I heard the last piece of pie calling my name.
Please see above note about the ECC curriculum available for free in Books on iPad. If you have access to this, please start with Lesson 1 in ebook. Teachers who have limited devices or a personal device can also mirror to a large screen in their classroom if they have an Apple TV.
From Everyone Can Create (Photo) Lesson 1: "There's beauty to be discovered in everyday objects when we look at their unique shapes, textures, and patterns. In this chapter, you'll learn to take photos of everyday objects with distinctive characteristics that you can enhance to tell imaginary stories. You'll discover how to photograph objects in a variety of lighting conditions and at different angles, and then adjust focus and exposure to optimize your images. And you'll practice using the editing tools in the Photos app to bring your photos to life."
Set up: I bring out a small roll of white seamless which I tape to the edge a tabletop, roll out across the table, and tape the other side to the top lip of a large Rubbermaid storage bin, with a couple of heavy books inside to anchor it. This creates a mini-studio effect for students, so that it's easy for them to take a photo of their object in a neutral setting, giving them tons of blank space to add their illustration ideas. They also really like the effect because they can get a fairly professional-looking photo that's ubiquitous in product photography, even on their iPad.
Select several objects for students to choose from. I use random objects I already have in my class: a stapler, a glue bottle, a coffee cup, a vintage camera, a little plant. I want to give them enough of a selection, but not too many things so they suffer from "decision paralysis." I call students over in groups of 3 or 4 to select an object, and take a photo of it on the white seamless with their iPad.
Here are some examples of student work, which I grouped together so you can see how differently they approach personifying the same objects.
If you have an Apple TV, it's really fun for students to mirror their screens to the large screen in the classroom and show their finished work. Model how to offer positive feedback and ask prompting questions of the students, like what do you like about this design? What do you notice? Giving students the opportunity to share their work at their discretion in a safe, supportive way can encourage them to feel more confident to share their work in the future. I've also given my students a chance to show their work anonymously, so we mirror an iPad to the screen, and after they hear the positive comments from their peers, they will frequently claim the work, and say, "I made that!" In middle school, that can be a huge step for a shy child.
Jokes in the time of Covid-19 / SEL in distance learning
Coding Connection: At its most basic, a program needs to function. Computer programmers use code so that a program will have a certain outcome or result. If it isn't functioning properly, programmers begin to pick apart the code and see what isn't working. We, as humans, can be like that. too. If we're not functioning properly, it's important to investigate what's going on, and try to tinker so we can function better. This is like looking at a person holistically. If a student is stressed or anxious about something, they may not be able to perform a math calculation or play a song on a musical instrument, for example. Most teachers see the value of Social Emotional Learning, and we always want to make sure our students feel safe and supported before we expect them to focus on the content of our classes or any other learning objective.
When our district moved to full-time distance learning due to Covid-19, we took the approach of asynchronous lessons. Teachers create lessons, including video tutorials that students view and complete when they're able. I support this decision 100% because it makes things more accessible to students who may be sharing devices, or even have to stagger their online usage because of bandwidth in their home. In addition, many students in middle school may be helping care for younger siblings during the day. As a matter of fact, I sometimes get notifications that my students have viewed a video or completed an assignment at 10 PM at night, or even later.
Although we aren't requiring students to meet us at specific times, we do have set times for "office hours" where students can hop onto a Zoom meeting if they need extra support or guidance with their work. I have a small number of students, a dozen or less, who come back day after day to my Zoom meeting (which is an hour every day) and that core group of students tend to have all their work complete when they show up. So other than reviewing their work or previewing the next project, we tend to just chat. It's not because I'm super fascinating. Students are showing up because they're bored, and they want to see each other! This time has actually allowed me to get to know them more than when I had them in my class in person, which has been a real gift.
We always start with a check in, to see how everyone is doing. I've started asking ice breaker kind of questions, like their favorite cereal, candy, superhero, cartoon, breakfast taco or pizza topping. This also helps them feel braver about unmuting themselves on the mic.
When a couple of my students candidly expressed that yes, they were sometimes feeling sad during this quarantine, I said I was going through the same thing myself... up one day and down the next. I can't remember who suggested it first, but we decided it would be fun to share corny "dad" jokes in our Zoom chats. It turned out to be one of the best things we could do. After we make sure everyone is on track for their lessons, students share their favorite jokes. It's been awesome, and hilarious. It gives us all a chance to laugh, which has been the best medicine.
One that I shared that got lots of groans:
Did you know that French fries weren't originally cooked in France?
That's right! They were cooked in grease.
Shared by Nahomi:
A customer at the bank asked if I would check her balance. So I pushed her, and she fell over.
Shared by Abel:
Do you want to hear a joke about construction?
I'm still working on it.
Shared by Juan: (this one worked best when typed into the chat)
What do you call a fish without any eyes?
Answer: fsh
Shared by Jillian: (she sent me this cartoon and I shared it with the group)
One more that went over pretty well:
Did I tell you guys that last week I broke my finger?
On the other hand, I'm fine.
I think telling corny jokes in class supports SEL objectives, and I may even incorporate jokes at the end of class when school reopens next year.
What is Batching?
As teachers, we do so many tasks! But we go through the same cycles over and over again: lesson planning, writing student-facing directions and examples, generating anchors of support, posting plans, making copies, grading, keeping up with classroom areas like bulletin boards, etc. In my photography business, I group tasks together so that I'm addressing a larger amount of similar work all at once, and then find that I spend less time transitioning from small task to small task. To approach my classroom this way, I like to think of it as "batching." Like batch editing photos, or even baking a batch of cookies.
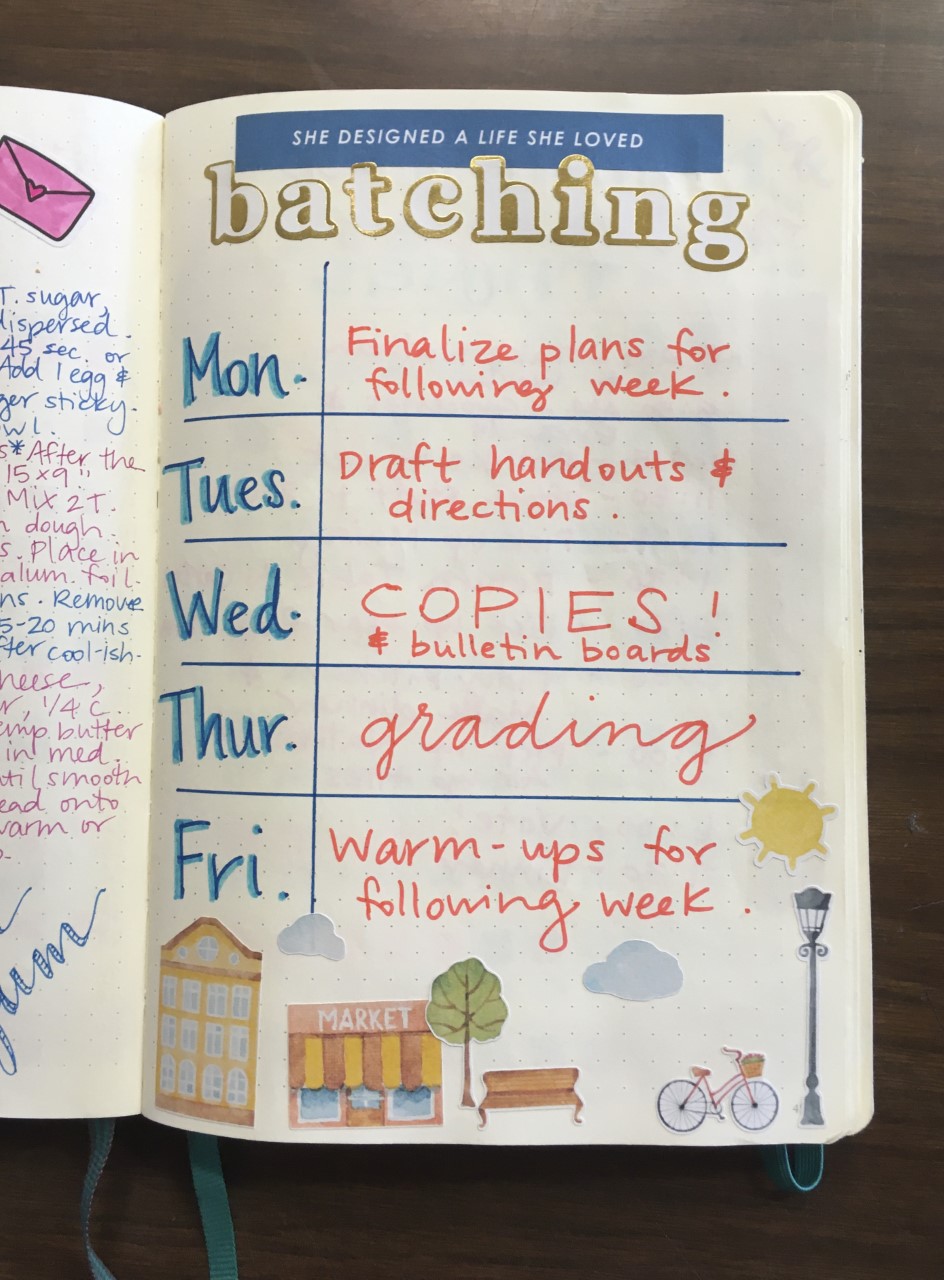
As much as possible, I try to group these tasks into each day of the week. so that I'm being more efficient and having less work to take home. One of my personal goals is to leave school every day by 4:30 and not take home work on the weekends. Of course, this isn't always possible, but using a batching schedule for the week helps to keep me more focused and effective. It's also been really good for my own sense of calm because I don't feel like I'm running from task to task in a frenzy.
Journals, always and forever.
I love journaling (always have) so I wanted to build in a journaling component to my classes.
My students write in their journals every single day as a warm-up activity. The journals are sacred. The content relates mostly to the course, but may also include some SEL kinds of prompts, such as gratitude journal, etc. When students leave my class, they take their journals with them as a self-created manual. See the journal pages on the Students Resource page.
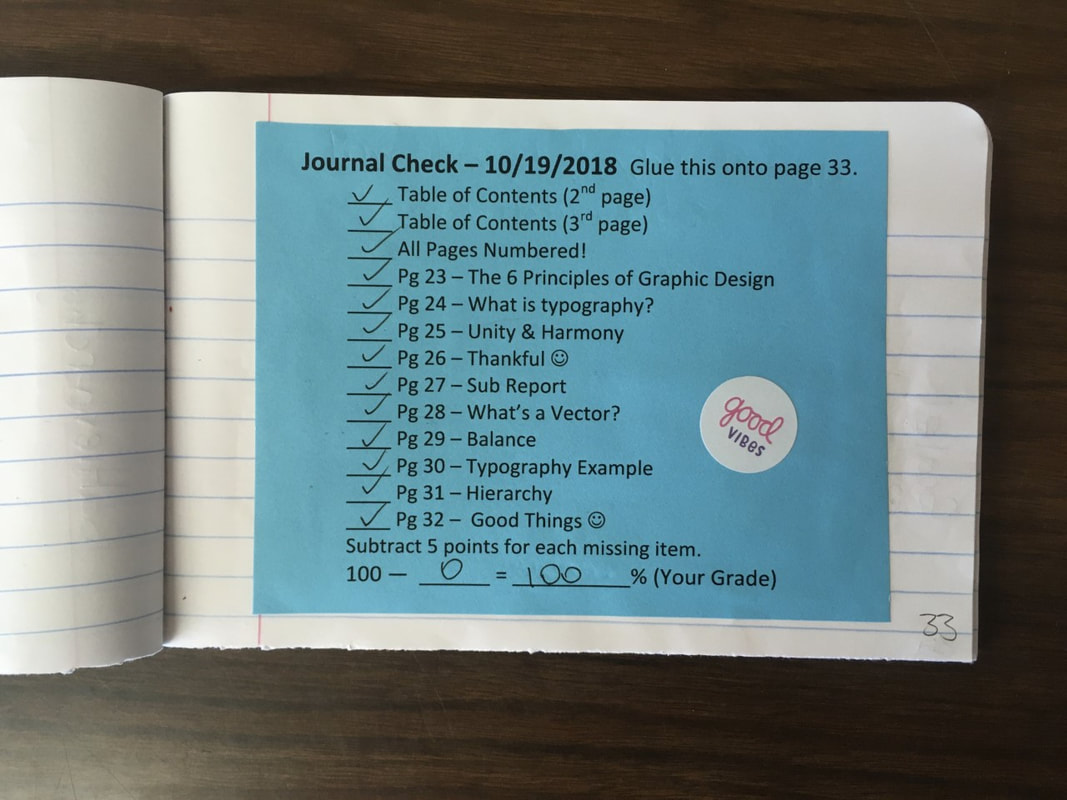
Journal pages must be numbered and if anyone was absent, they need to skip that page and number it to make it up later. This way we can keep track of any missing work.
Every 3 weeks I have students grade their own journals, checking off a list of pages, which they glue into their journal. They subtract 5 points for any missing page. Most students like to complete the missing pages, because it's so easy to go to the Google slides link, so I usually have awesome journal grades. When I'm taking the grade, I flip through the journal to eyeball and make sure no pages are blank, and then put a sticker or stamp on the grade to confirm it's official in the gradebook.
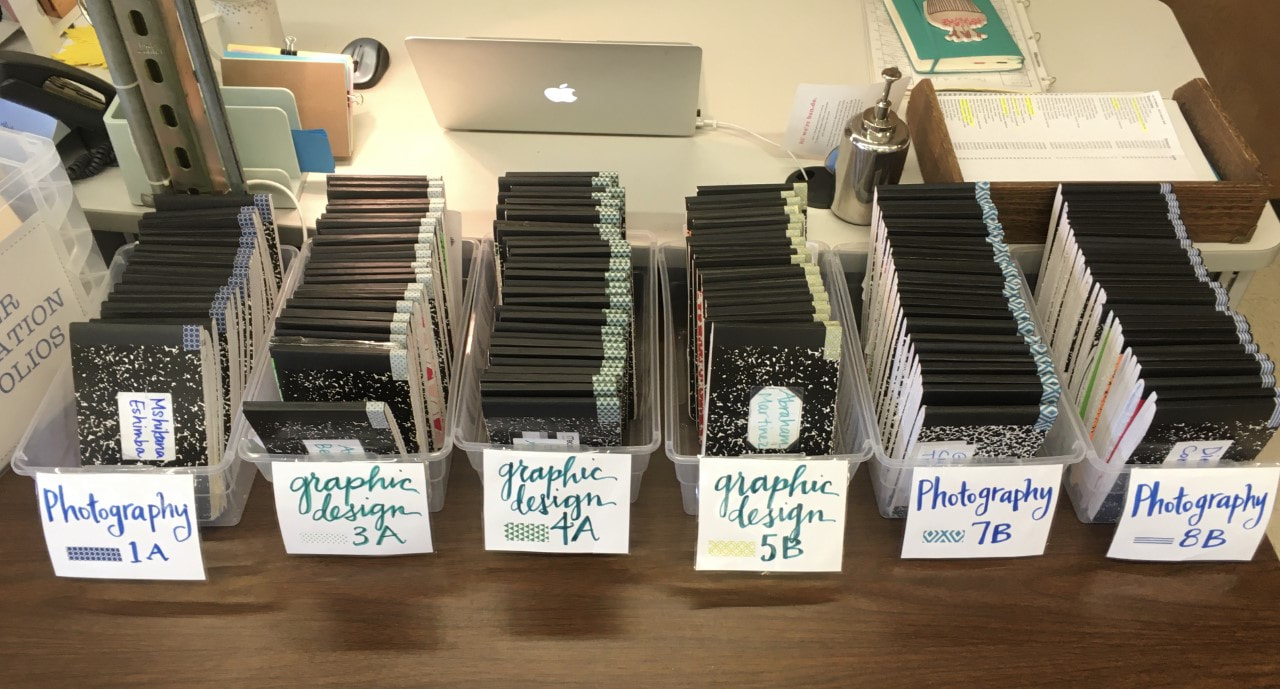
I cut journals in half with the help of a friend and her table saw. We cut 3 or 4 at one time. Cutting journals down not only gives you double the journals, students really don't need a whole page for a warm-up and they love the novelty of the smaller journal size.
How to get FREE journals: Ask your bookkeeper or dept chair for composition books at the beginning of the year or semester, or purchase with budget money (usually available after Sept 1). I also offer students a free Homework 100 if they donate a journal, so that gives me at least 20 or so more, even if every student isn't able to purchase one. I usually take my full enrollment of students, divide it by 2 and add at least 10 or 15 more. I always have students who enroll late, so it's nice to have spare journals. If students drop the course or withdraw, I keep their journals to use for new students.
We don't start the journals until the second or third week of classes, so it gives me a little lead time to get organized without breaking the bank. By that time, we have several things we've completed that we can glue into the journals.
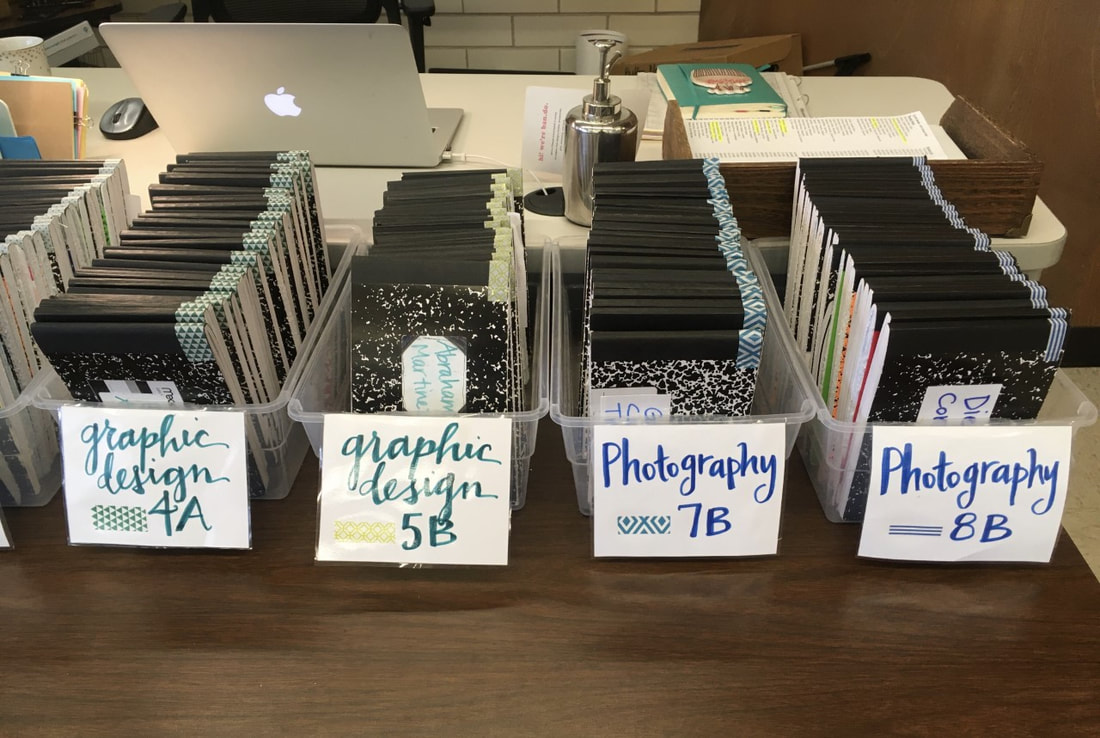
As many as 30 will fit into a plastic shoebox size container.
washi tape to the rescue.
I use washi tape to designate each class. I put a piece of the tape across the top of the journal spine, so kids can easily get their journals in the correct box, and I use the washi tape to differentiate my periods, like on my TEKS board.
I also use a piece of the tape on my seating charts for my own reference and/or to help out a sub.